Modern technology has allowed a further appreciation of old media than what was possible with technology of its time. In this vain, upscaling older, cel based and early digital anime was an endeavor I wanted to embark on. I recently acquired a second GPU for my computer and can now tolerate the time required to upscale hours of video on GPUs--by using the other GPU for games.
Modern upscalers all tend to work on a per image basis--you have to feed them images rather than a video. As older anime usually consist of a handful of OVAs or 12-24 episodes, the process of doing this manually for each video file was slightly unappealing. I therefore decided to create a batch script to automate the entire process. I could simply point to a folder containing all of the video files, and the script would handle cutting the video into individual frames, upscaling, and reencoding into video before merging into the original Matroska file containers to get back the audio, subtitles, and chapters. This process would therefore require a CPU intensive ffmpeg task, before an upscaling task performed on the GPU, before going back to the CPU for encoding. This was performed on an offset undervolted Intel 7940x and an EVGA (rip) RTX 3060 XC power limited to 120W to maintain noise levels low enough to sleep through. Something I had never heard about before starting this--upscaling is extremely storage demanding. Video decomposition alone can take hundreds of gigabytes before upscaling. I had to split up the before and after upscaling image sets--before was stored on my 480GB Intel 900p while the after was stored on a RAID0 of twin 1TB Samsung 970 EVOs.
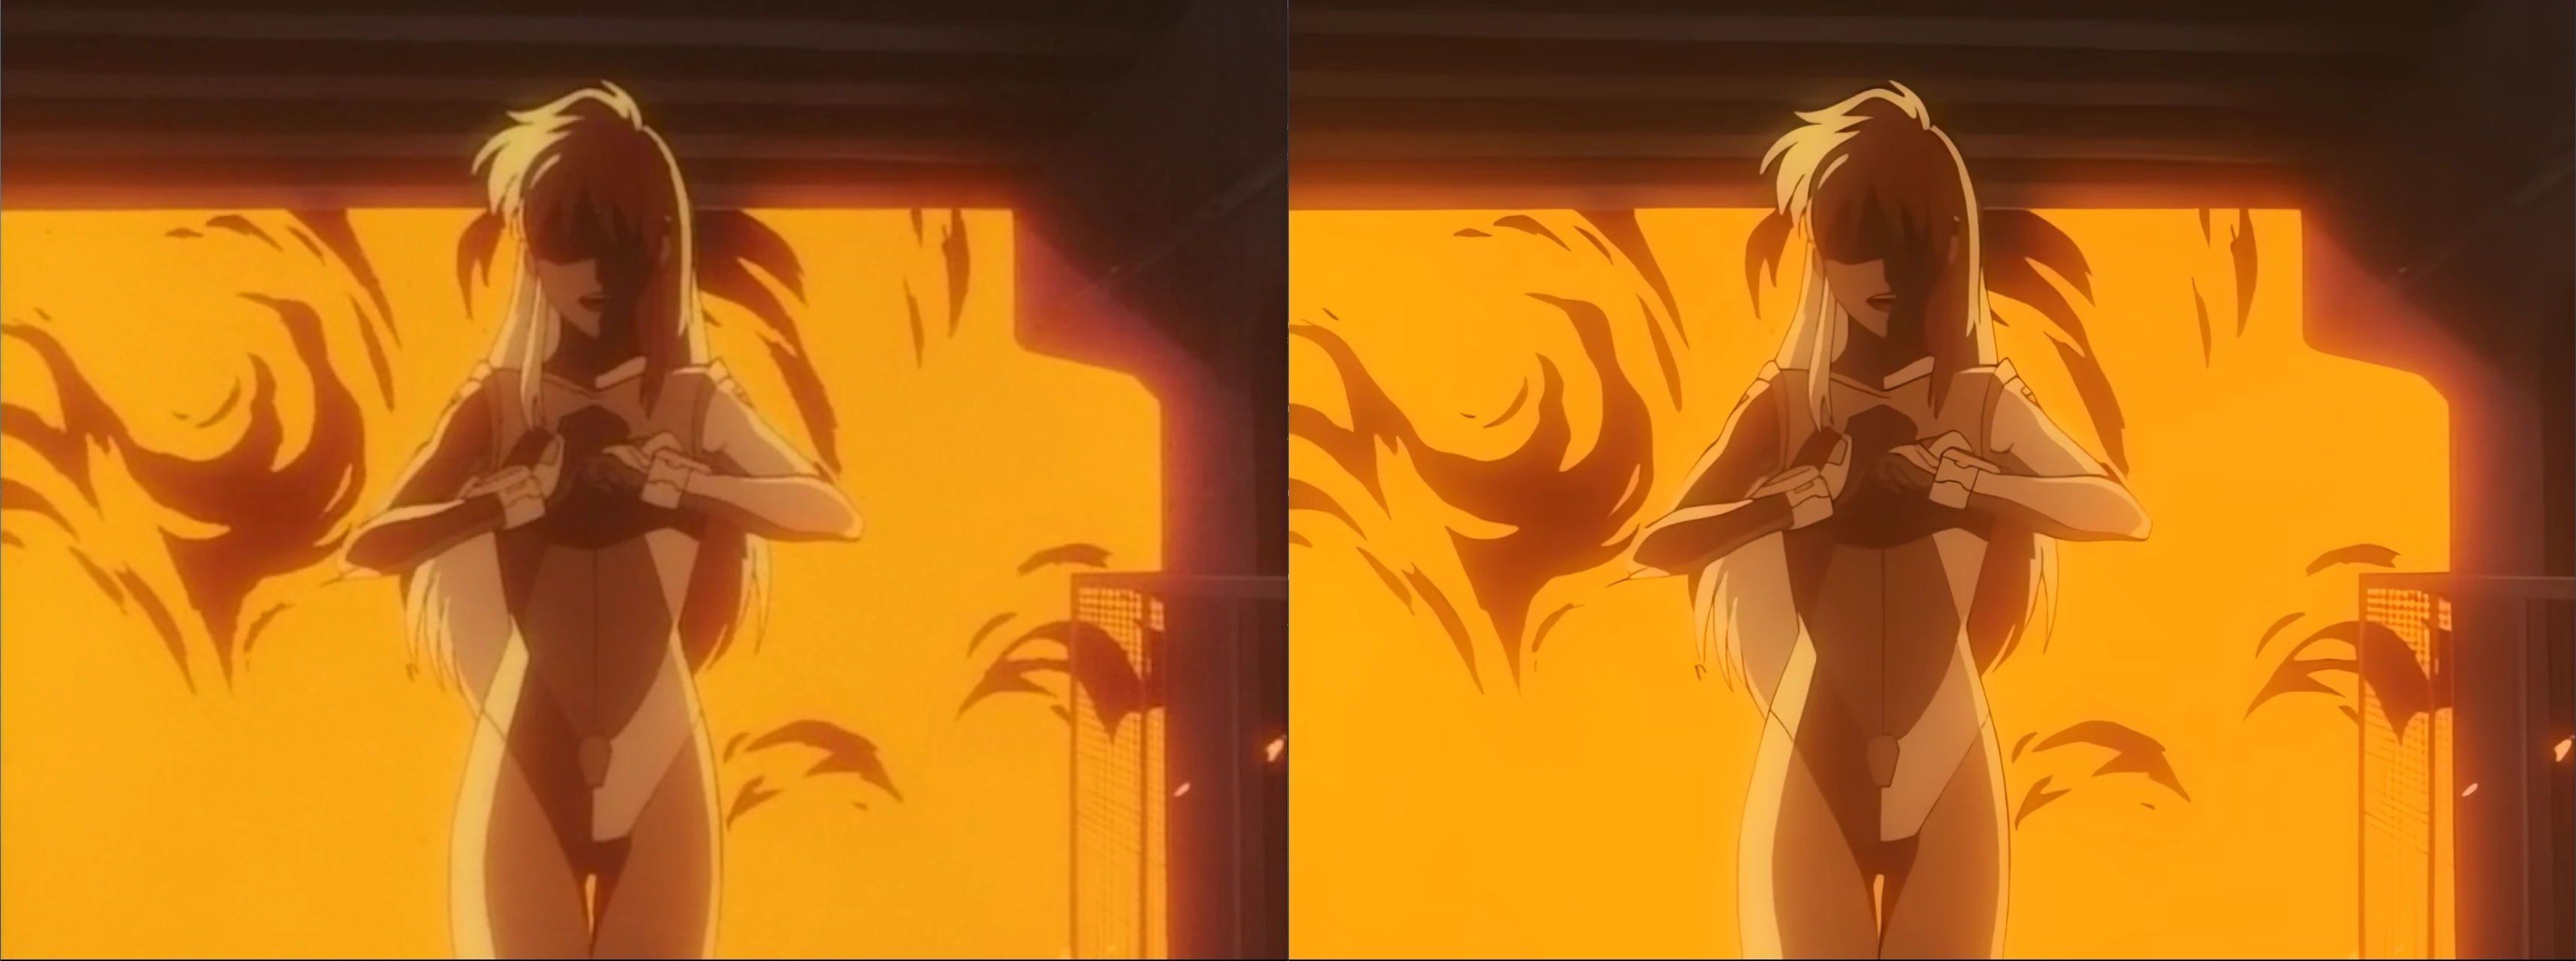
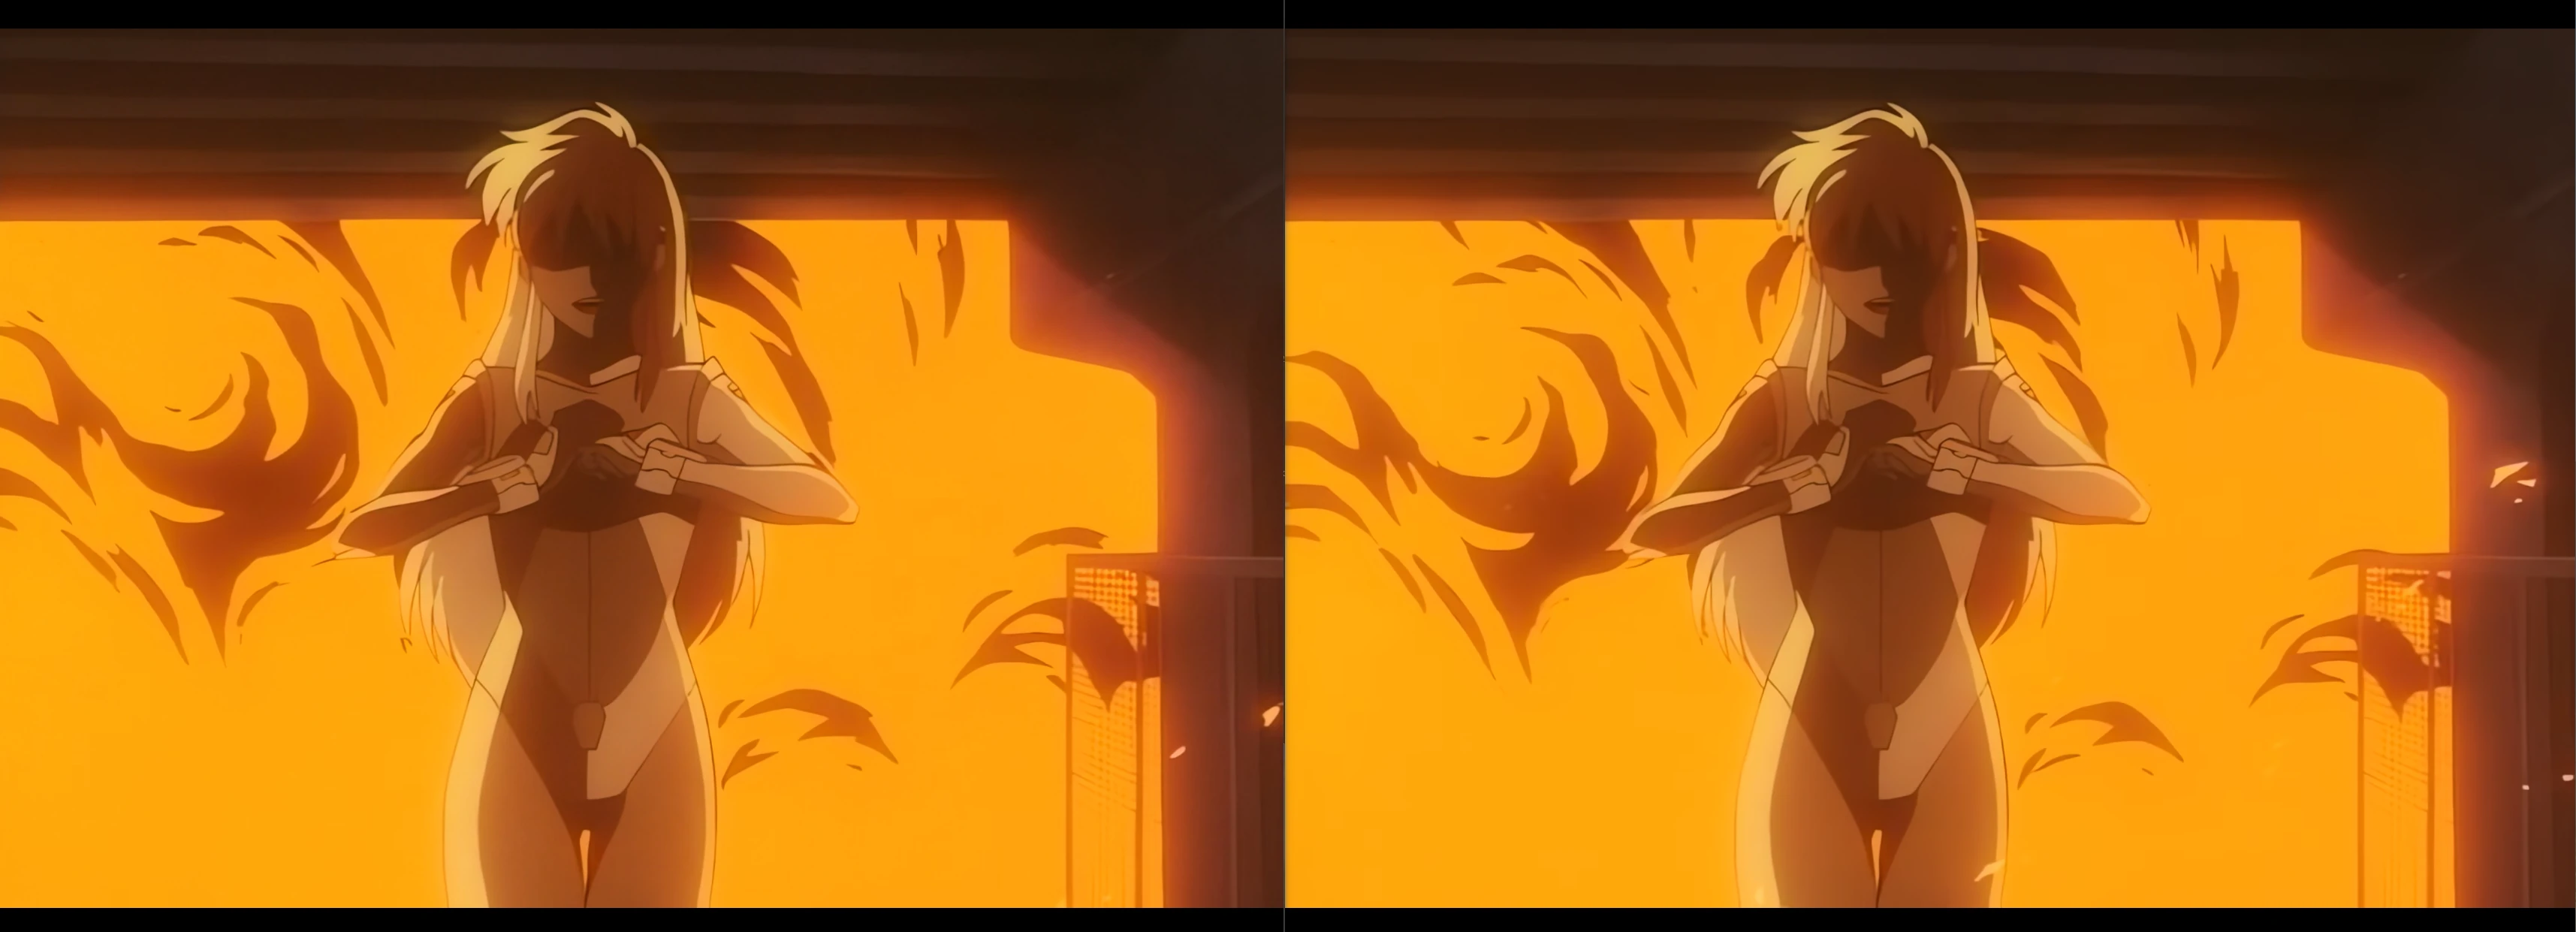
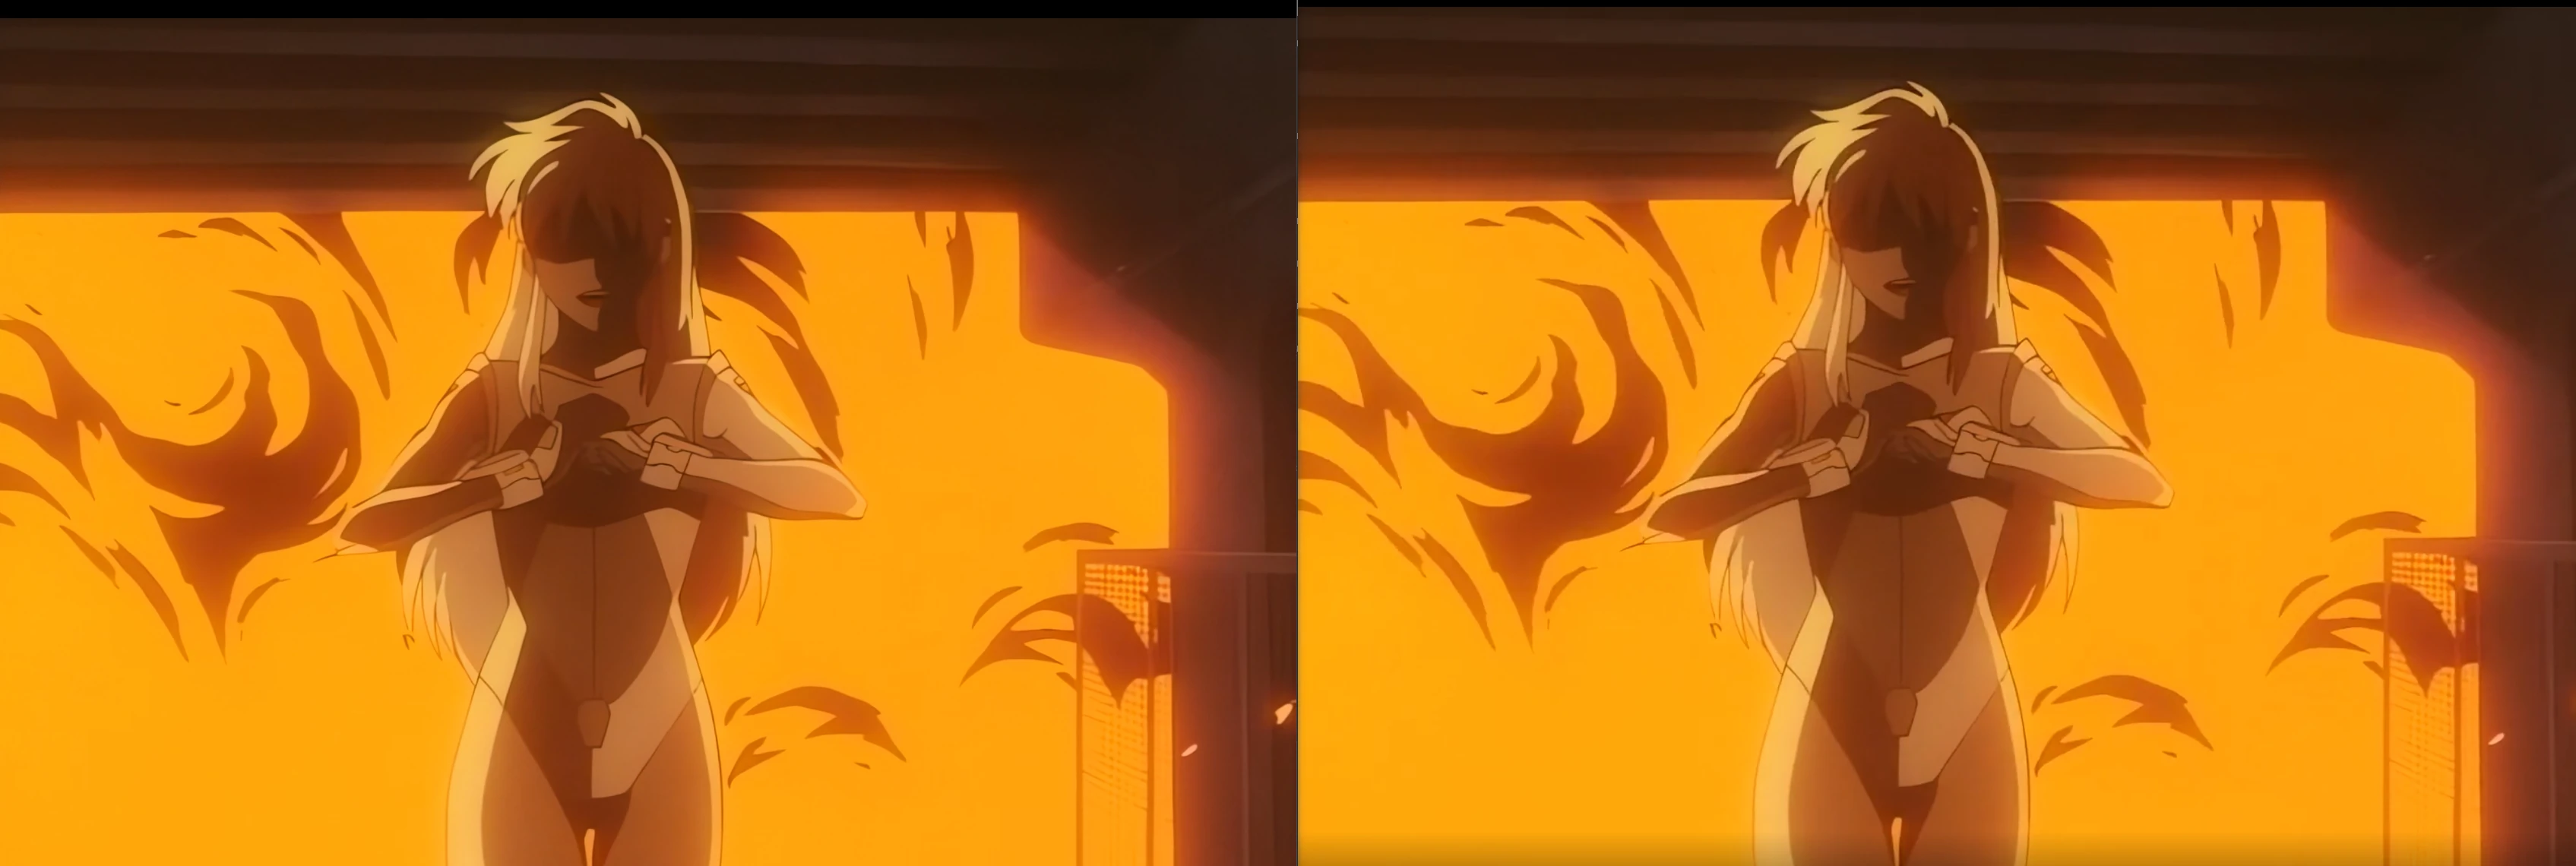
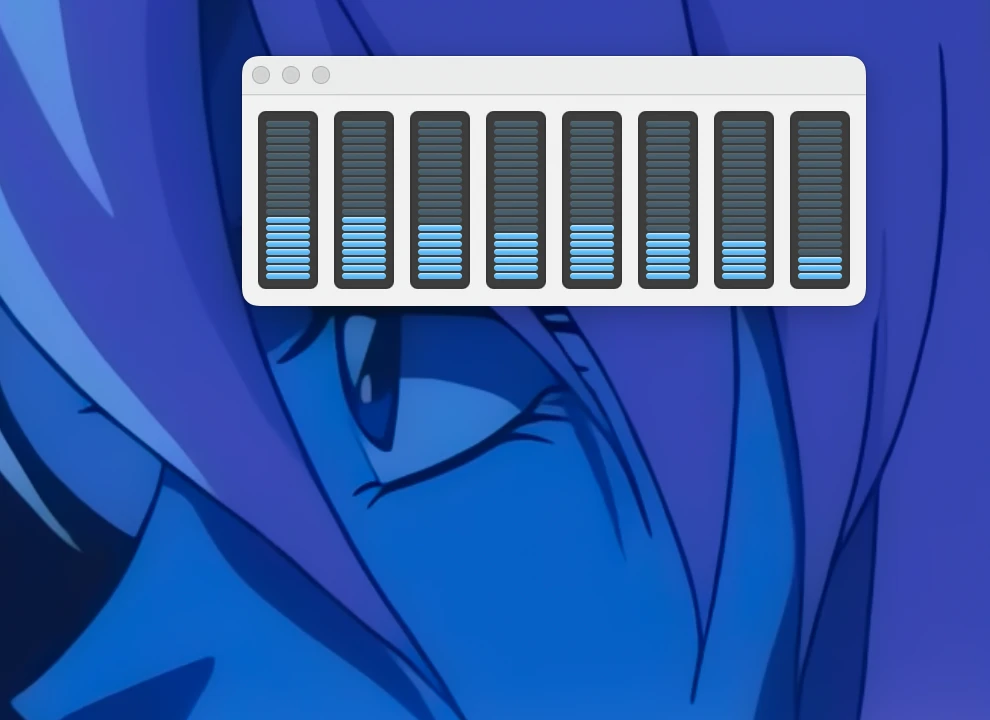
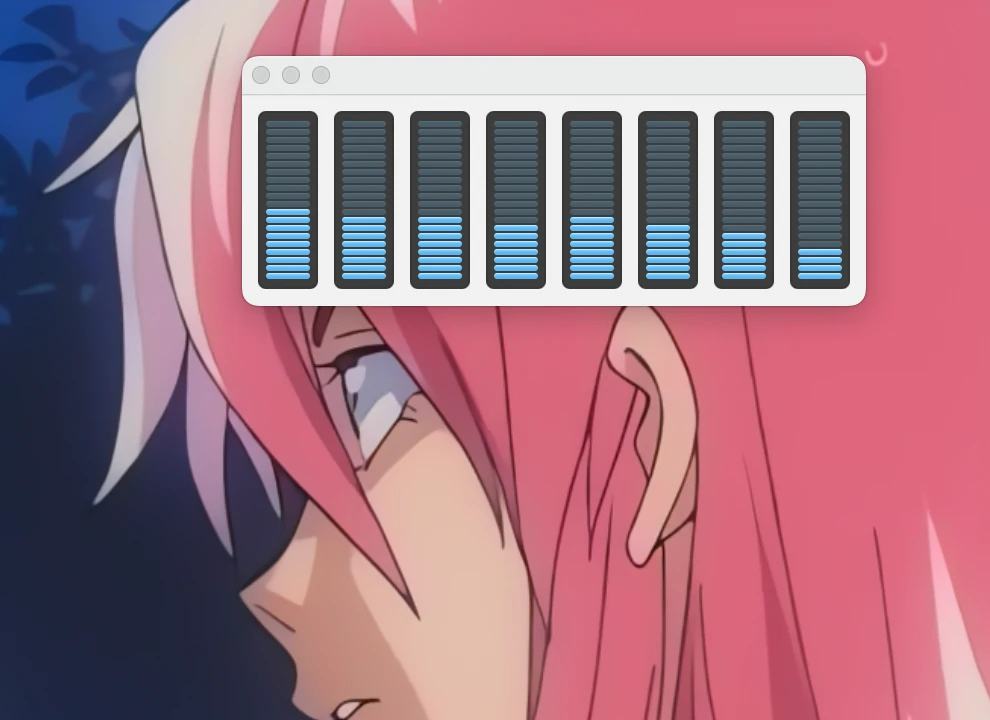
Of the myriad of upscalers available online, I decided on waifu2x and Real-ESRGAN as the two I would be trying on each series. Real-ESRGAN in general seems to result in a much smoother, sharp, modern looking image, while waifu2x retains much of the original character of the media while performing some sharpening and noise removal. Both of these were set to a scale of 2 (4x the original resolution) with waifu2x at a noise level of 2 and the results of both are shown below on the original Tetsuwan Birdy 1996 OVAs.
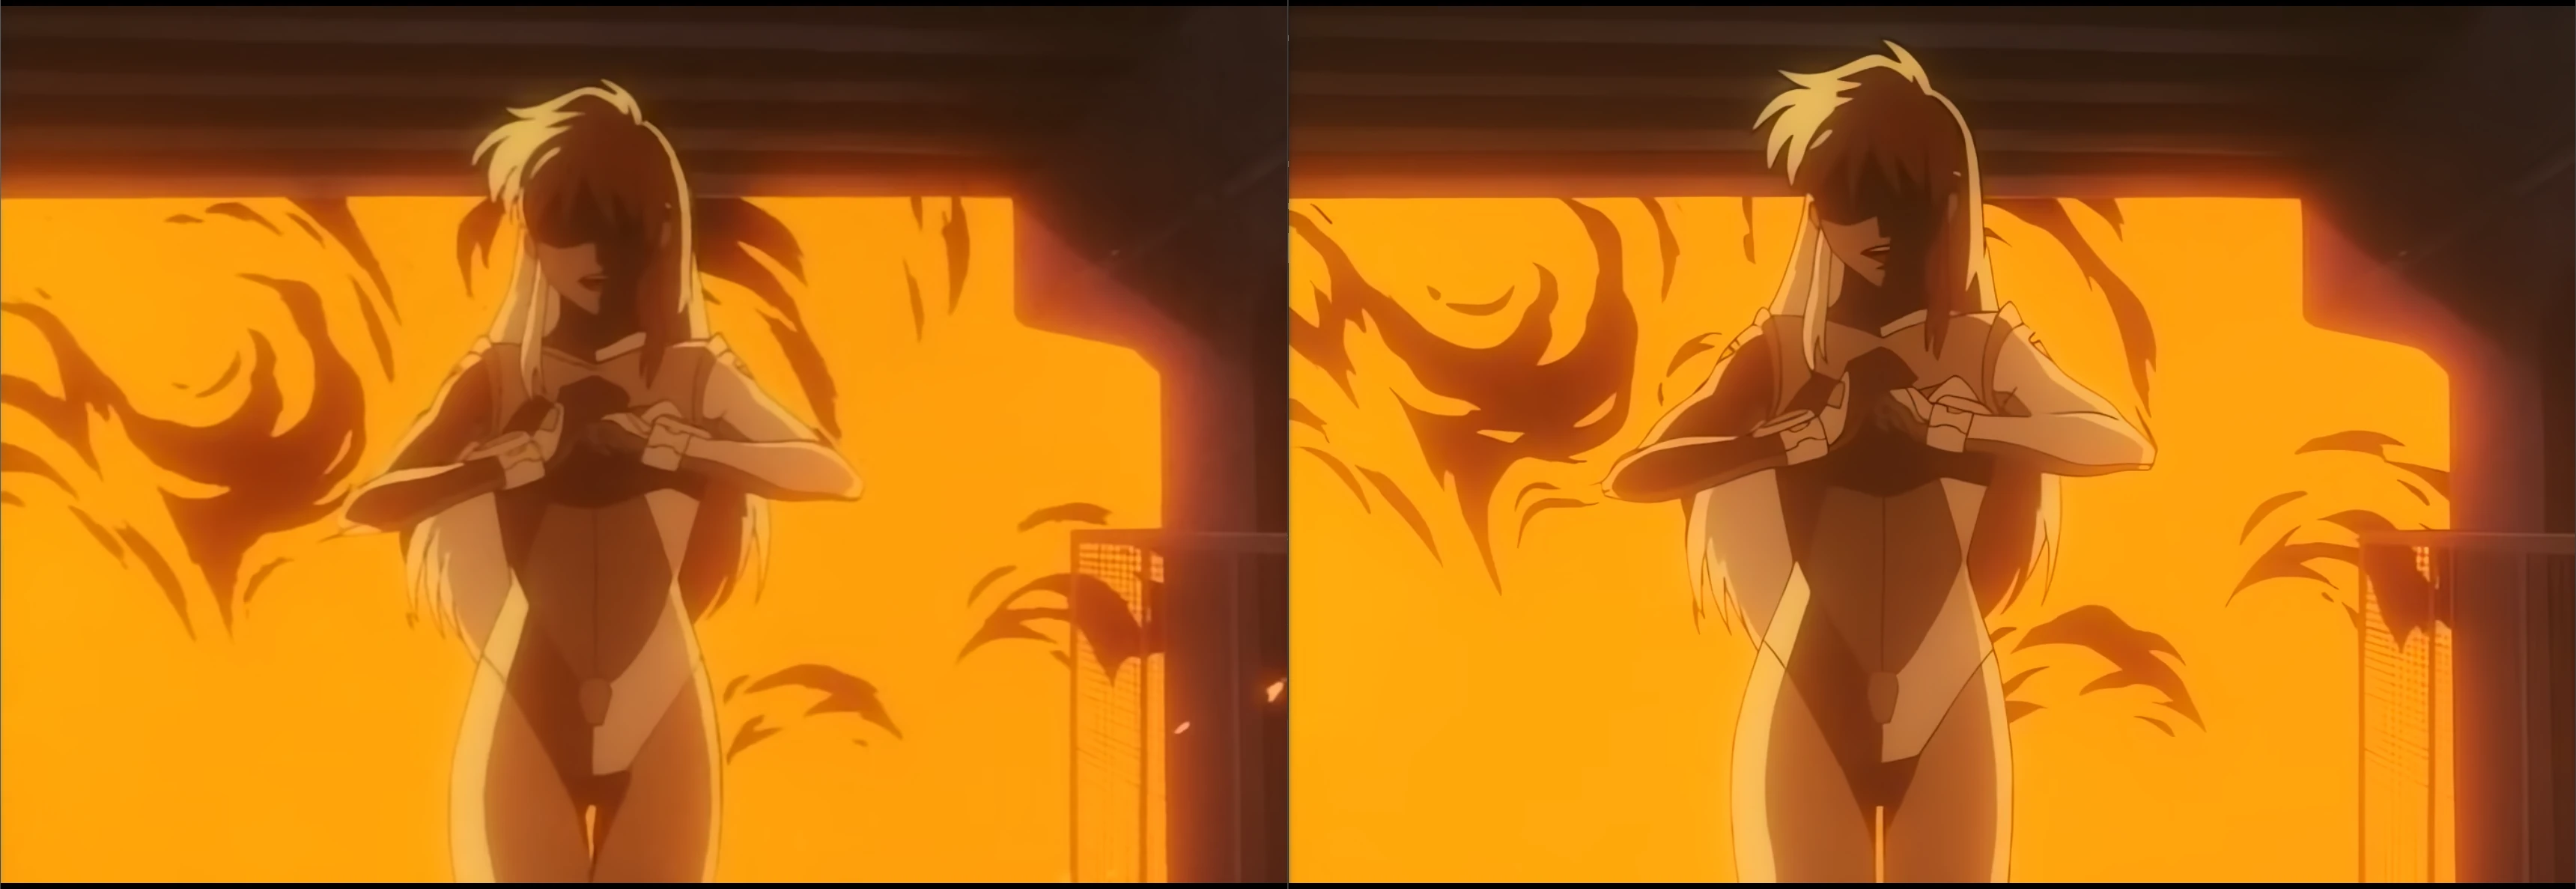
Something to note is that, while Real-ESRGAN looks better at its best, it has artifacts not present in the waifu2x upscale. In scenes with small, moving detail, Real-ESRGAN seems a bit incapable of handling the detail steadily, instead resulting in bloches and artifacts that are very apparent when looking at them. This can be combated by feeding the upscaler as much detail as possible--higher detail videos don't suffer from this artifacting nearly as bad. In the end, I generally preferred the result of Real-ESRGAN as it looks very similar to the original cels of the show.
Encoding settings played a much larger part in this process than I had originally thought. The process of encoding the upscaled images back into a video can introduce lots of new artifacting and noise compared to the images themselves. Therefore, a fair amount of time was spent testing encoder settings and codecs to yield the best possible result while maintaining reasonable file sizes.
In testing, I tried the libx264, libx265, and libsvtav1 encoders. Quickly H.264 encoding was ruled out due to the quality compromises at file sizes comparable to the H.265 codec. AV1 encoding, while yielding the best quality at a given file size, is also intensive to decode. This can cause performance limitations on lower power devices and those without dedicated AV1 decoders which had to be considered when choosing an encoder.
For these encoders, two main settings dictated the quality of the resulting video: CRF and color depth. The -crf flag sets a targeted perceieved quality level via the amount of bits dedicated to each frame. It accepts a number between 0 and 63, where lower is higher quality and larger resulting file size. For H.265 encoding, a near lossless result is likely somewhere around 20 (this is a guess based off of AV1 encoding by libaom-av1 at 23 being equivalent to libx264 at 19[0], both being considered approximately lossless[1]). The color depth options available were 8 and 10 bit color--I chose 10 bit as it yielded a negligible increase in file size.
Specifically available for the libsvtav1 encoder was the -preset flag, which presents a tradoff between a faster, less efficient encode for a slower, more efficient one. This value ranges from 0 to 13 and somewhat arbitrarily I initially chose 5. This resulted in an encode speed of about 0.4x realtime (e.g. 2.5s to encode 1s of video) which I found acceptable for the quality of the output. In testing this further, it seems like each single decrease in preset (each step of better efficiency and quality) seems to about half speed of the encode--preset 4 is about 0.2x, preset 3 is about 0.1x.
As I mentioned above, I was worried about the decoding performance on lower end and older devices--having these be available on my phone, laptop, etc, would be nice. I reencoded the Real-ESRGAN upscale with the --fast-decode=1 and --keyint=240 flags to compare (I'll refer to this as the fast decode version). In testing this on my desktop, it seemed that the fast decode version had slightly better seeking performance and seemingly identical processor usage as the original version. I suspect this might be in part due to the AV1 decoder on my GPU being utilized (although GPU usage was seemingly identical as well).
After moving to my M1 Macbook Air, I found that the original version used between 50-70% of my CPU but instead had instant seeking performance when using MPV via Rosetta 2. For the fast decode version, my seeking performance was worse--the system would not immediately start playing new sections of the video after seeking around. This is likely due to the keyint flag separating out I frames more--this causes the decoder to have to rebuild more P frames based on the original I frame to get to where you're at in the video. CPU usage was slightly down here, at around 35-60% instead. With this in mind, I believe that the decoding performance is adequate with the original version encoding settings.
Sometimes ffmpeg will stretch or squeeze a video when processing commands. This is done by changing what's called the Pixel Aspect Ratio (PAR). Normally a 1:1 ratio for digital content, this can change to induce a change in Display Aspect Ratio (DAR) without changing Storage Aspect Ratio (SAR) (e.g. 1920x1080p). Inversely, ffmpeg can actually revert this to a 1:1 ratio if the original content is not. This happened to be the case for the original copy of these OVAs. I hadn't initially noticed this because of the SAR being the same as before, but after a side by side comparison the difference was obvious. Thanks to Michael Wells for this answer on superuser--I would not have figured this out nearly as fast without it.
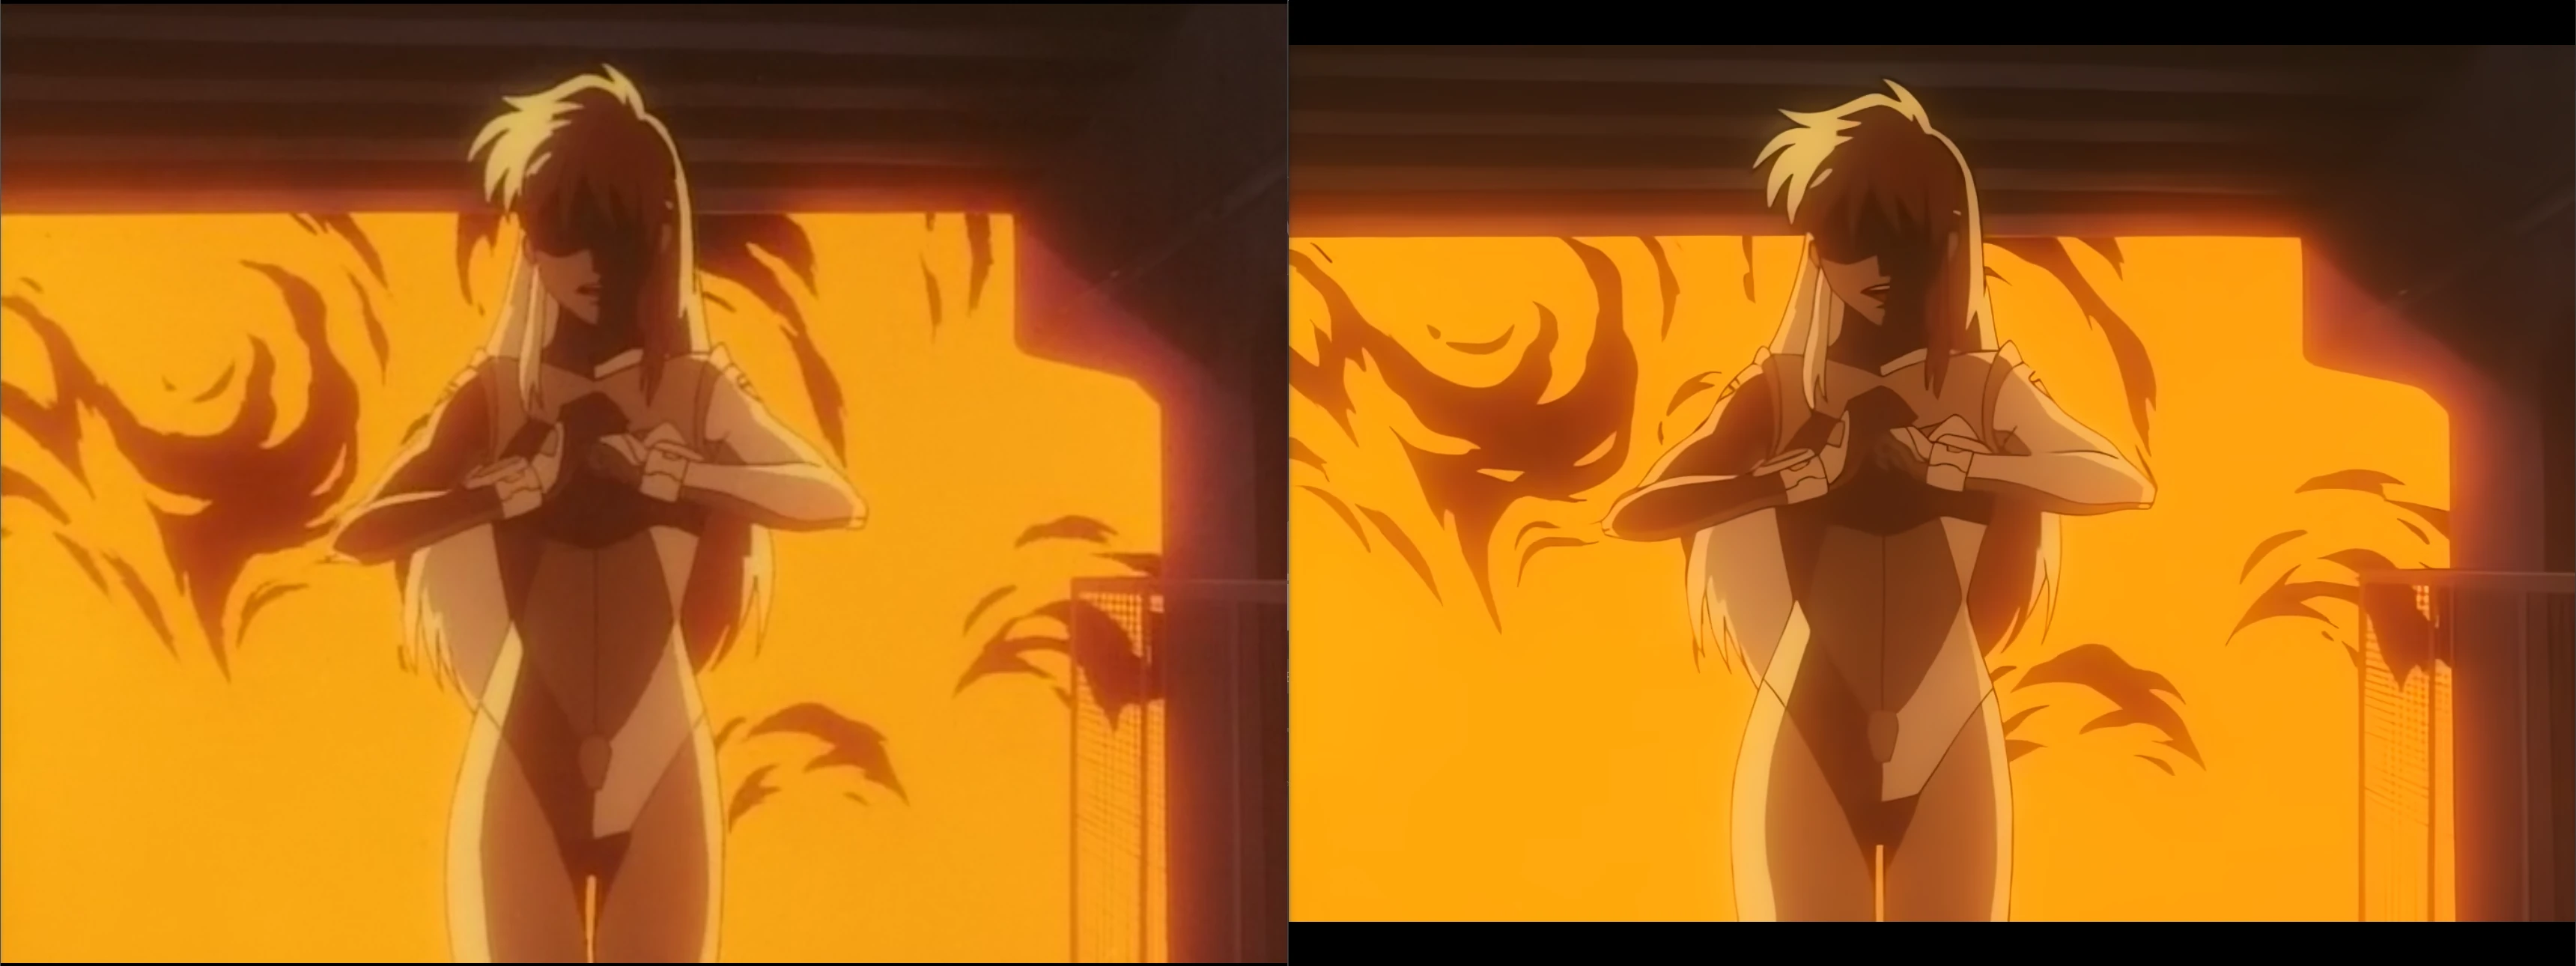
Analyzing the SAR and DAR, the original copy had a SAR of 704x480 pixels and DAR of 704:525. This original copy therefore was stretched to a PAR of about 1:1.094. This seems to be a natural result of ripping from a DVD. 704 pixels seems to be a good way to represet PAL and NTSC video[2] and, to maintain a 4:3 ratio with NTSC 480p, PAR is adjusted to compensate[3]. This adjustment brings PAR back to the original standards on DVD: non-square[4]. Using the solutions in the above superuser answer, the encoding process can correct this from when ffmpeg originally reverts the PAR when cutting up the frames.

The upscalers I'm using are only spatial, not temporal. Thus, there are scenes where small detail shimmers and shifts around when upscaled. I've been reading into spatio-temporal upscalers to possibly use instead. None of these seem to have portable executables available so my script most likely wouldnt be applicable to these. Further, I'm unsure as to how well I could apply such upscalers to this as I don't possess motion vectors for the action onscreen.
Training my own model would possibly yield better results than the baked in models for these upscalers, specifically Real-ESRGAN. Doing this might end up removing the artifacting introduced by Real-ESRGAN. I'm not entirelly sure if training it against the upscaled and original versions would be productive or if training on the original and then a compressed version of that would be better. Also available are custom models users upload online--some appear to be trained specifically on retro anime, so that might end up being a viable option for this.
The upscaling script is architected to work on a single video file at a time. To do this, I run ffmpeg sequences and send the entire folder of photos to the upscaler. This means at the end of the upscaling, I have two entire copies of the video in images on my drive before deletion can occur. This could probably be changed to instead work on a per image basis--upscaling an image and then deleting the original before moving onto the next. This would save around 10-30% of the peak storage requirements, but I'm unsure as to how that would affect the speed of upscaling (requiring it to start and stop the process vs feeding a sequence of files). Also batch files break easily. Moving this to python might be advisable.
[0] Towards much better SVT-AV1 quality-cycles tradeoffs for VOD applications ^
[1] AV1 Video Encoding Guide ^
[2] Sharc on Doom9 ^